Last Updated on July 6, 2026 by skraito with Lord Jesus Christ
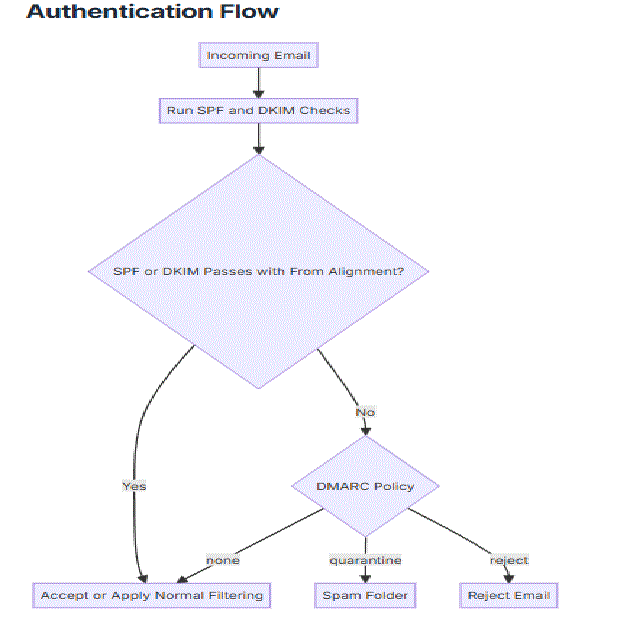
SPF, DKIM, and DMARC work together as a layered defense against email spoofing. Without them, anyone can send email pretending to be from your domain. Major email providers increasingly expect these records for reliable delivery. If your domain lacks them, expect your mail to land in spam or get rejected outright.
Here is what each one does:
- SPF – Tells receiving servers which IP addresses are allowed to send mail for your domain
- DKIM – Adds a cryptographic signature to each outgoing message, proving it came from your server
- DMARC – Ties SPF and DKIM to the visible From domain with a policy that tells receivers what to do when neither check passes with alignment
Part 1: Setting Up SPF
SPF is purely a DNS record. No server-side configuration needed for outgoing mail.
Create the SPF DNS Record
Add a TXT record to your domain’s DNS:
Copyexample.com  IN  TXT  "v=spf1 mx a ip4:203.0.113.10 -all"
Copyexample.com  IN  TXT  "v=spf1 mx aaa ip6 fea.some.thing -all"
This record says:
mx– Allow IP addresses of servers listed in MX recordsa– Allow the IP addresses from the domain’s A or AAAA recordsip4:203.0.113.10– Explicitly allow this IP-all– Mark everything else as not authorized (hard fail)
Use ~all (soft fail) during testing, then switch to -all when you are confident.
https://drive.google.com/drive/folders/1G4-8ro2WSsrpGQxroXhbOEF_rThmHX4q?usp=sharing

# INSTALL ALL
sudo dnf install -y pypolicyd-spf-3.1.0-6.el10_2.noarch.rpm pypolicyd-spf-milter-3.1.0-6.el10_2.noarch.rpm opendkim-2.11.0-0.42.el10_1.x86_64.rpm opendkim-tools-2.11.0-0.42.el10_1.x86_64.rpm opendmarc-1.4.2-33.el10_2.x86_64.rpm opendmarc-tools-1.4.2-33.el10_2.x86_64.rpm
Add to /etc/postfix/main.cf:

Copy
# SPF checking for incoming mail
policy-spf_time_limit = 3600s
smtpd_recipient_restrictions =
    permit_mynetworks,
    permit_sasl_authenticated,
    reject_unauth_destination,
    check_policy_service unix:private/policy-spf
Add to /etc/postfix/main.cf:

Copy
# SPF checking for incoming mail
policy-spf_time_limit = 3600s
smtpd_recipient_restrictions =
    permit_mynetworks,
    permit_sasl_authenticated,
    reject_unauth_destination,
    check_policy_service unix:private/policy-spf

Add to /etc/postfix/master.cf:

policy-spf  unix  -       n       n       -       0       spawn
    user=nobody argv=/usr/libexec/postfix/policyd-spf
Add to /etc/postfix/main.cf:
Copy
# SPF checking for incoming mail
policy-spf_time_limit = 3600s
smtpd_recipient_restrictions =
permit_mynetworks,
permit_sasl_authenticated,
reject_unauth_destination,
check_policy_service unix:private/policy-spf
Add to /etc/postfix/master.cf:
policy-spf unix - n n - 0 spawn
user=nobody argv=/usr/libexec/postfix/policyd-spfPart 2: Setting Up DKIM
DKIM requires both DNS records and server-side signing software.
# Create the key directory
sudo mkdir -p /etc/opendkim/keys/example.com

# Generate a 2048-bit DKIM key pair
sudo opendkim-genkey -b 2048 -d example.com -D /etc/opendkim/keys/example.com -s default -v

# Set ownership
sudo chown -R opendkim:opendkim /etc/opendkim/keys/
This creates two files:
default.private - The private key (stays on the server)
default.txt - The DNS record to publish
Configure OpenDKIM
Edit /etc/opendkim.conf:
Copy# Logging
Syslog yes
SyslogSuccess yes
LogWhy yes
# Signing and verification
Mode sv
Canonicalization relaxed/simple
# Socket for Postfix communication
Socket inet:8891@localhost
# Trusted hosts that we sign for
ExternalIgnoreList refile:/etc/opendkim/TrustedHosts
InternalHosts refile:/etc/opendkim/TrustedHosts
# Key and signing tables for multiple domains
KeyTable refile:/etc/opendkim/KeyTable
SigningTable refile:/etc/opendkim/SigningTable
Create Supporting Files
Create /etc/opendkim/TrustedHosts:
Copy127.0.0.1
localhost
::1
*.example.comCreate /etc/opendkim/KeyTable:
Copy
default._domainkey.example.com example.com:default:/etc/opendkim/keys/example.com/default.private
Create /etc/opendkim/SigningTable:
Copy
*@example.com default._domainkey.example.com
Publish the DKIM DNS Record
View the DNS record:
Copy
# Display the DKIM DNS record
sudo cat /etc/opendkim/keys/example.com/default.txt
Add this as a TXT record in DNS for default._domainkey.example.com.
Integrate OpenDKIM with Postfix
Add to /etc/postfix/main.cf:
Copy
# DKIM signing via OpenDKIM
milter_default_action = accept
milter_protocol = 6
smtpd_milters = inet:localhost:8891
non_smtpd_milters = inet:localhost:8891
Start OpenDKIM
Copy
# Enable and start opendkim
sudo systemctl enable --now opendkimPart 3: Setting Up DMARC
Create the DMARC DNS Record
Add a TXT record for _dmarc.example.com:
_dmarc.example.com. IN TXT "v=DMARC1; p=none; rua=mailto:dmarc-reports@example.com; ruf=mailto:dmarc-forensic@example.com; pct=100"
Start with p=none to monitor without affecting delivery. The parameters:
p=none - Take no action (monitor only)
rua - Address for aggregate reports
ruf - Address for forensic reports
pct=100 - Apply to 100% of messages
DMARC Policy Progression
Move through these stages:
p=none - Monitor for a few weeks, review reports
p=quarantine - Ask receivers to treat failed messages as suspicious, often by placing them in spam
p=reject - Ask receivers to reject failed messages
Install OpenDMARC for Verification
To verify DMARC on incoming mail:
Edit /etc/opendmarc.conf:
CopyAuthservID mail.example.com
FailureReports false
Socket inet:8893@localhost
SPFSelfValidate true
SPFIgnoreResults true
Add to /etc/postfix/main.cf (append to existing milters):
Copysmtpd_milters = inet:localhost:8891, inet:localhost:8893
non_smtpd_milters = inet:localhost:8891, inet:localhost:8893
Start OpenDMARC:
Copysudo systemctl enable --now opendmarc
Testing Everything
Test SPF
Copy# Query your SPF record
dig TXT example.com +short
Test DKIM
Copy# Verify the DKIM DNS record
dig TXT default._domainkey.example.com +short
# Test the key
sudo opendkim-testkey -d example.com -s default -vvv
Test DMARC
Copy# Query your DMARC record
dig TXT _dmarc.example.com +short
Send a Test Email
Send a test to a Gmail address and check the headers. Look for:
CopyAuthentication-Results: mx.google.com;
dkim=pass header.d=example.com;
spf=pass (google.com: domain of test@example.com designates 203.0.113.10 as permitted sender);
dmarc=pass (p=NONE)
Reload Everything
Copy# Reload all services after configuration changes
sudo systemctl reload postfix
sudo systemctl restart opendkim
sudo systemctl restart opendmarc
Troubleshooting
DKIM signature not appearing in headers:
Check that OpenDKIM is running and the milter is connected:
Copysudo systemctl status opendkim
sudo ss -tlnp | grep 8891
SPF failing for legitimate mail:
Your SPF record might be missing an authorized IP. Check what IP the mail originates from and add it.
DMARC reports showing failures:
Review the aggregate reports. Common causes include forwarding services and mailing lists that modify the From header.
Wrapping Up
SPF, DKIM, and DMARC are table stakes for running a mail server today. Set them up in that order, start DMARC in monitor mode, review the reports, and gradually tighten the policy. Your deliverability will improve and your domain will be protected from spoofing.THAT’S ALL KID HOW TO SETUP MAIL SERVER FOR WEB NOW … .
FIND TUTORIAL YOURSELF KID HOW TO MAKE ZEROSSL WITH PHP FROM PREVIOUS POST … .
HERE THE GUIDE … .
APACHE … .
NGINX … .
DOWNLOAD WEBMAIL FROM HERE … .
https://drive.google.com/drive/folders/1G4-8ro2WSsrpGQxroXhbOEF_rThmHX4q?usp=sharing
IT CALL SQUIR MAIL … .
COMMENT HERE IF YOU HAVE QUESTION OR SOMETHING NOT WORKING KID … . IN THIS POST … . OR IF YOU HAVE QUESTION … .